Pages

Wednesday, January 19, 2011

Maple Pecan Butter


As you can see, there was one big fan of the maple pecan butter I made. You can see her grabbing for the toast "buttered" with the pecan butter below. She was not waiting on the green light for when mommy was finished taking her pictures.


Like the walnut butter I posted about in the fall, this is as easy to make. So simple, I wonder why making your own nut butters isn't more mainstream. It makes those expensive types like cashew, walnut, or almond butter, much more accessible to everyone.

Maple Pecan Butter

1 lb. of pecans
2-3 Tbsp. maple syrup
1/2 - 1 tsp. salt

Preheat the oven to 300 degrees Fahrenheit. Roast pecans on a baking sheet for 15-20 minutes, until it has a nice roasted smell. Make sure to spread out the nuts, so they are not layered on top of each other. Remove from oven and let cool completely. Add the pecans to the food processor. Process  for 1-2 minutes, stop and scrape the sides of the processor. It will look like the picture below.


Next process again for 2-3 minutes, until it has the consistency below, stopping to scrape a couple times. Now add the maple syrup, one tablespoon at a time and mix, keep adding a tablespoon until it is sweetened to your taste.  Next do the same for the salt. Be sure to not add too much maple syrup or salt, as it can affect the consistency and flavor of the pecan butter.


Once desired taste is achieved, add to a jar with a secure lid and refrigerate until use. It should be stored in the refrigerator. Below is a picture of how it looked once it was in the jar.


Lastly, I made a toasted maple pecan butter and pumpkin butter sandwich. They are a delicious combination!

Thursday, January 13, 2011

Vegan Sausage Bacon Tofu Sandwich with Cheese


If you find yourself missing the non-vegan version of a sausage, egg, bacon and cheese biscuit, I think this will quell any cravings for it. It is all the better for being cruelty-free.

Now we aren't big proponents of eating a lot of highly processed vegan substitutes. That being said, on rare occasions we may make something like this. My son enjoyed it quite a bit, but preferred eating the components separately. 

My hubby joking said he is going to make the vegan version of a "double down." If you have no idea what that is, imagine a fast food creation which eliminates buns made of bread and replaces them with fried chicken patties. Even a vegan version sounds over the top to me. 

The biscuit sandwich was made pretty easy by frying 1/4 inch thick slabs of tofu on both sides in canola oil for about 5 minutes  on medium heat. The vegan sausage here is made by Lite Life and is called Gimmie Lean Sausage. The vegan bacon was made by the same company, and is called Smart Bacon. They were prepared following the instructions on the package.

The cheese is made by Bute Island and is the Sheese Smoked Cheddar variety. To make the biscuits, we use a Bisquick Heart Start mix, since we're often short on time with two young kids. If you decide to try it, just be sure to get the Heart Start kind of Bisquick, as the regular kind has trans fat in it.

Tuesday, January 11, 2011

Vegan Pizza Day


We're looking forward to participating in Vegan Pizza Day. I haven't decided whether we'll use it as an excuse to go out to eat or if we will make our own.

I'm not going to lie, when I began the steps towards becoming vegan, I saved cheese as the last non-vegan item to eliminate from my diet. That was over a decade ago, and boy has vegan cheese options improved leaps and bounds since then.

I'm about to commit blasphemy in the vegan blogosphere. Our family likes Cheezly better than, well if your vegan you know what cheese I'm referring to. There I said it. While Daiya seems to be a front-runner for many vegans, I've found that it really depends on what I'm making what brand of cheese I use.


Daiya is perfect for pizza, since it melts well and has the texture of cheese. My skeptical sister has deemed pizza we ordered at ZPizza with Daiya as tasty. Whenever we make english muffin or bagel pizzas, Tofutti slices are our cheese of choice. They fit perfectly and melt well.


When looking for more developed, strong flavor, we like to use Sheese Smoked Cheddar. In casseroles or calzones, we prefer Cheezly. In my humble opinion Cheezly really comes the closest to "cheese" taste if that is what you seek. My non-vegan family members like to eat it plain, as do we. I appreciate a cheese that stands alone for taste.


There are a couple of types of cheese that we haven't tried yet, that I am looking forward to testing out. The first is Dr. Cow's cheese made from a variety of nuts. These sound like they'd be great with crackers. The other brand is Teese. They've recently released a new product, vegan mozzarella sticks, which I am excited to try. Vegan Essentials keeps selling out of them so fast!


These are among our favorites, what are yours? Any you recommend trying?

Sunday, January 9, 2011

Vegan Chocolate Peanut Butter Cup Cupcakes


If you've read my previous blog entries, you're aware of my not-so-secret love affair with chocolate and peanut butter. Last week, I was thinking about what to make for my son's birthday and suddenly it popped into my head, vegan chocolate peanut butter cup cupcakes.


As in chocolate peanut butter cups baked right into the cupcake. It took longer than your average cupcake to make, but it was well worth it. The vegan peanut butter cups were homemade, but you could buy them already made by Sjaak's or Allison's Gourmet if it suits your fancy.


The peanut butter cups were made using this recipe from a friend's vegan family blog. I used a peanut butter cup mold and filled it with the absolutely delicious filling.

Vegan Peanut Butter Cups

1 jar natural peanut butter
1 package of graham crackers (there are usually 3 packages per box, the Keebler original are vegan)
2 cups of powdered sugar
1 stick of softened Earth Balance Buttery Sticks margarine (not melted)
1 1/2 Boxes of Baker's Semi-Sweet chocolate


Start by melting three-quarters of the chocolate on the stove using a double broiler. I heat a small amount of water in a larger sauce pan, and melt the chocolate in a smaller pan nested in the larger one. DO NOT let water get into your chocolate, as it will seize up the chocolate. Once it is melted well, take it off of the burner and add the remaining chocolate. This tempers the chocolate, so it dries with a nice shiny finish. 

Crush the graham crackers into crumbs in a food processor or in between two pieces of wax paper, rolled over with a rolling pin. Mix together the graham cracker crumbs, sugar, softened margarine, and powdered sugar. Depending on the thickness, you may need to kneed it with your hands. 

Using a peanut butter cup mold, coat the mold to create the cup for the filling. Put it into the freezer a couple minutes. take it out once it is hardened, and fill with the peanut butter filling. Coat the top of the coat with a layer of chocolate then put in freezer a couple minutes again. Remove when it is completely hard and shake out of mold. 


Lately I've been using the crazy cake recipe that originates back to WWI, and I did for these as well. It made just over a couple dozen cupcakes. As always, I altered the recipe, but only a couple minor changes.

Crazy Cake

3 cups unbleached flour
2 cups sugar
2 teaspoons baking soda
1 teaspoon salt
1/3 heaping cup cocoa
1 Tbsp. white vinegar
1 teaspoon vanilla
 3/4 cup vegetable Oil
 2 cups water

Preheat the oven to 350 degrees Fahrenheit. Sift together flour, cocoa, sugar, baking soda, and salt. Add remaining wet ingredients with dry ones and mix. Do not over mix. Fill cupcake liners halfway full and add peanut butter cup to the center of the cupcake batter. Bake in oven for 11-14 minutes until a toothpick comes out clean. Be sure to not stab the peanut butter cup when checking with a toothpick, it should be done on the side of it. Once cooled frost with peanut butter frosting.

Peanut Butter Frosting

1/4 plus 1 Tbsp. vegetable shortening
2/3 cup peanut butter
3 cups powdered sugar
2 tsp. vanilla
2-3 Tbsp. soy or almond milk

Cream together the margarine, shortening, and peanut butter. Slowly mix in powdered sugar and soy milk, alternating between the two. Once mixed well, beat for about five minutes until frosting is nice and fluffy. Add more powdered sugar or soy milk to obtained desired texture.


Cupcake on Foodista
I selected this post to be featured on my blog’s page at Vegan Blogs.

Monday, January 3, 2011

Vegan and Vegetarian Family 101

A friend told me her son was refusing to eat chicken when he understood what it really was. She is being supportive of his decision and exploration of his personal self, and asked for my help on some vegetarian alternatives that aren't all highly processed soy-based foods.

This got me to thinking about compiling a list of resources, which have been helpful to our family. These are merely a drop in the bucket, but a great place to start.

First and foremost, I wanted to share a site I came across, which chronicles real vegan babies and children's lives. It it a more detailed look at a vegan lifestyle, and demonstrates how a well-balanced vegan diet is a healthy option for children and babies.

The most common concerns for parents feeding their children a vegan or vegetarian diet are: nutrition, healthy recipes, and social implications.

My favorite books I have returned to time and again for raising my children vegan are: Raising Vegetarian Children by Joanne Stepaniak and Raising Vegan Children in a Non-Vegan World by Erin Pavlina.

Raising Vegetarian Children : A Guide to Good Health and Family Harmony Raising Vegan Children in a Non-Vegan World: A Complete Guide for Parents

The second book is unfortunately out of print, but there are some used copies available. If you are having trouble tracking down a copy, I recommend checking the library first or local animal rights groups which may have a copy to loan or sell. Lastly, check around with friends to see if they have one you could borrow.

While my kids are not in school yet, I couldn't resist ordering Vegan Lunch Box by Jennifer McCann. It contains many great recipes and fun ideas to spruce up lunch time for your kids. There are recipes for quick meals and more involved ones - something for everyone. In fact, sometime soon I'm going to give away a copy on here, so stay tuned.
Vegan Lunch Box: 130 Amazing, Animal-Free Lunches Kids and Grown-Ups Will Love!

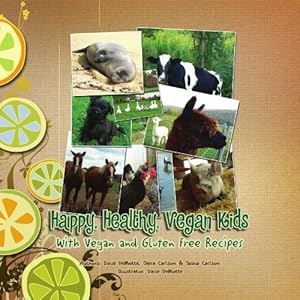
Along with books for adults, I highly recommend Happy, Healthy Vegan Kids by Tracie DeMotte. It is loaded with lots of colorful pictures of animals, and my kids really enjoy it. I do edit it to keep it appropriate for the age. For example, there are a couple longer pages that give more detail than I think my children are ready for at their age.

Happy, Healthy, Vegan Kids: With Vegan and Gluten Free Recipes

Another favorite of my children is Victor's Picnic with the Vegetarian Animals by Radha Vignola. I like this one a lot, because it does a great job illustrating the myriad of vegetarian animals, from mice to gorillas to elephants.
Victor's Picnic: With the Vegetarian Animals
I help run a local vegan and vegetarian family group called Vegkins, through the Animal Rights Coalition. They helped to organize a story time conducted by Teaching Compassion MN for our group. It is an excellent local resource for teachers and parents. My favorite story from that event was Hey Little Ant by Phillip and Hannah Hoose.
Hey, Little Ant

For older children, I recommend That's Why We Don't Eat Animals by Ruby Roth. The pictures are somewhat darker in nature at times, and I personally decided to save this one for when my kids are school age.
That's Why We Don't Eat Animals: A Book About Vegans, Vegetarians, and All Living Things
There are numerous web resources available. Here are a few of my favorites:

Sunday, January 2, 2011

Akara Black-eyed Pea Fritters


Below is the recipe I promised from New Year's Eve fondue night. The ingredients are from a recipe I cut out of VegNews, but since I didn't get the next page with the instructions, I had to make it up. They were delicious, and the recipe will now join our rotation of foods.

My son Elliott couldn't get enough of these. Evelyn was more ambivalent, but it was only our first go at it. We did alter the recipe a little, because we didn't have a hot chile or fresh ginger. Instead we used a jalapeno pepper, and ground ginger.

Akara Black-eyed Pea Fritters

1 can of black-eyed peas drained
1/2 cup onion
3-4 garlic cloves minced
1 jalapeno pepper
1/4 cup red bell pepper
1 tsp. ginger
1 1/2 tsp. ground cumin
1 tsp. ground coriander
1/4 cayenne
1/2 tsp salt
1/4 tsp. black pepper
1 cup cornmeal
oil for deep frying

We threw it all into the food processor until it was well mixed, after stopping and scraping the sides a few times. The batter stuck to the spoon and had to be shaken off, so add more corn meal if it seems too runny. Deep fry for 3-5 minutes on 300 degrees.